

To build a lemon battery, gather lemons, zinc (galvanized nails) and copper (pennies or wire) electrodes, connecting wires, and alligator clips. Insert the zinc and copper into each lemon without letting them touch, then connect the lemons in series to boost voltage. When you link them properly, you’ll see it power small devices like LEDs. If you’re curious about optimizing your setup, exploring different configurations can help you learn even more.
Key Takeaways
- Use fresh lemons, zinc (nails or strips), and copper (pennies or wire) to create electrodes for the battery.
- Insert zinc and copper electrodes into opposite sides of the lemon without touching inside.
- Connect electrodes with wires and alligator clips to form a circuit, increasing voltage by linking multiple lemons.
- Test the battery by powering small devices like LEDs or using a multimeter to measure voltage output.
- Ensure proper safety measures, electrode cleanliness, and correct polarity for optimal performance and safety.

National Geographic Mega Science Lab - Kit for Kids with 75 Easy Experiments, Featuring Earth Science, Chemistry Set, and Magic STEM Projects for Boys and Girls (Amazon Exclusive)
THREE SCIENCE KITS IN ONE - This kit contains 45 of our most popular Earth science, chemistry, and...
As an affiliate, we earn on qualifying purchases.
Components Needed for a Lemon Battery

To build a lemon battery, you need specific components that work together to generate electricity. First, gather electrodes made of copper and zinc. You can use pre-1982 pennies or copper wire for the copper, and galvanized nails, zinc-plated washers, or zinc strips for zinc.
Each lemon requires one copper and one zinc electrode, fully submerged in the juice without piercing the peel, so handle sharp items with pliers for safety. You’ll also need fresh, juicy lemons with thin skins—about 4 to 6 for a standard setup. Using an appropriate electrolyte, such as lemon juice, enhances the electrical conductivity essential for the battery to work effectively. Properly connecting the wires ensures effective electric current flow for the lemon battery to work efficiently. Additionally, understanding how electrochemistry works can help you optimize your setup and improve the battery’s performance. Knowing how to measure voltage with a multimeter can help you monitor your battery’s output. Including a voltage test at different stages of setup allows for better troubleshooting and understanding of the process. Finally, have a small knife for preparation and a workspace that’s flat and non-conductive.

Thames & Kosmos Mega Cyborg Hand STEM Experiment Kit | Build Your Own GIANT Hydraulic Amazing Gripping Capabilities Adjustable for Different Sizes Learn Pneumatic Systems
Build your own awesome, wearable mechanical hand that you operate with your own fingers.
As an affiliate, we earn on qualifying purchases.
How the Lemon Battery Works

When you insert zinc and copper electrodes into a lemon, a chemical reaction begins that generates electricity. Zinc acts as the anode, where zinc atoms lose electrons (( text{Zn} rightarrow text{Zn}^{2+} + 2e^- )) and release electrons into the external circuit. This process is similar to how oxidation occurs in electrochemistry, helping to understand how electron transfer produces voltage. These electrons travel through the wire to the copper electrode, which acts as the cathode. There, hydrogen ions (( text{H}^+ )) in the lemon juice attract electrons and form hydrogen gas (( 2text{H}^+ + 2e^- rightarrow text{H}_2 )). The lemon juice, rich in citric acid, supplies hydrogen ions and conducts ions between electrodes, completing the circuit. The flow of electrons produces a small voltage, typically around 1 volt, enough to power tiny devices like LEDs. Understanding electrochemical reactions can help you optimize the lemon battery’s performance. Additionally, ionic conductivity plays a crucial role in facilitating the movement of ions and improving the efficiency of the battery.

Evviva Sciences Microbiology Science Project Kit, Pre-Poured Agar Plates for Students, Agar Petri Dishes to Learn Microbiology, with Educational Experiment eBook
THE COMPLETE SCIENCE KIT: Start your science experiment journey with our kit, complete with 10 pre-poured agar plates,...
As an affiliate, we earn on qualifying purchases.
Preparing Your Lemon for the Experiment

Preparing your lemon properly can make a big difference in the experiment’s success. First, choose fresh lemons at room temperature to maximize juice and chemical reactivity. Rolling the lemon firmly while pressing down helps release more juice and breaks up juice-filled pouches, boosting electrolyte effectiveness. A good color accuracy can also be achieved by selecting organic lemons, ensuring fewer pesticides interfere with the chemical reactions. Clean the lemon’s surface to prevent contamination. If your lemon has thick skin, you might need to make small cuts or pierce it to insert electrodes easily. Avoid green or overly ripe lemons, as they may be less effective. Using a properly prepared lemon ensures better electrical contact and consistent results. Use a sharp knife on a stable surface and wear gloves to handle the acidity safely. Drawing guidelines on the lemon can help with electrode placement, ensuring good contact with the electrolyte. Proper preparation guarantees a more efficient and reliable lemon battery.

Discovery™ Super Reactions Science Kit – 66 Experiments STEM Lab for Kids| Includes Chemistry Tools, Volcano Mold, Slime, Reactions & Explosions|Educational Learning Toy|DIY Activity Set Gift| Ages 8+
✔ 66 ACTION-PACKED SCIENCE EXPERIMENTS – Includes 26 step-by-step guided activities and 40 bonus DIY ideas using household...
As an affiliate, we earn on qualifying purchases.
Assembling the Lemon Cell

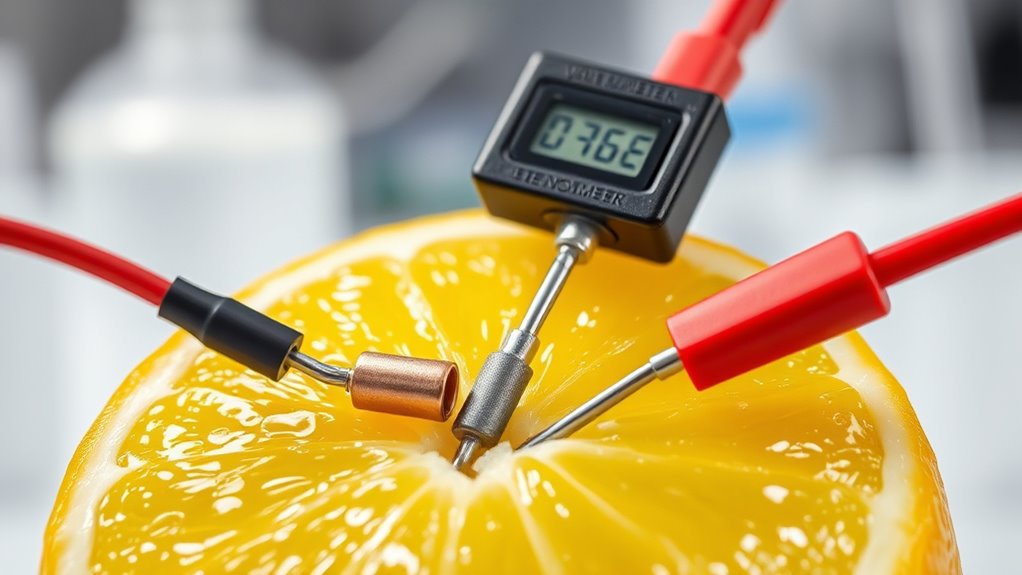
Assembling the lemon cell involves inserting the chosen electrodes into the lemon without letting them touch inside.
First, insert the anode, such as a galvanized nail or zinc nail, into one side of the lemon.
Then, insert the cathode, like a copper wire or penny, into the opposite side.
Make sure both electrodes are pushed in securely but remain separated inside the lemon.
Ensure electrodes are securely inserted and kept apart inside the lemon for proper functioning.
The lemon juice acts as the electrolyte, facilitating electron flow between the electrodes.
Avoid letting the electrodes touch each other inside the lemon, as this would short-circuit the cell and stop the reaction.
Once in place, you’re ready to connect your electrodes to form a circuit or add multiple lemons in series to increase voltage.
Proper placement ensures the chemical reactions can occur efficiently.
Additionally, using essential oils such as lemon or eucalyptus in the lemon can enhance the electrolyte properties and improve the cell’s performance.
Incorporating AI-powered analysis can help optimize electrode placement and improve the efficiency of your lemon battery, just like maintaining optimal air purifier performance is crucial for indoor air quality.
Implementing proper electrode spacing is essential for maximizing the voltage output and ensuring consistent energy production.
Using electrolyte enhancers like salt or vinegar can further boost the cell’s power and longevity.
Connecting Your Circuit and Testing the Setup
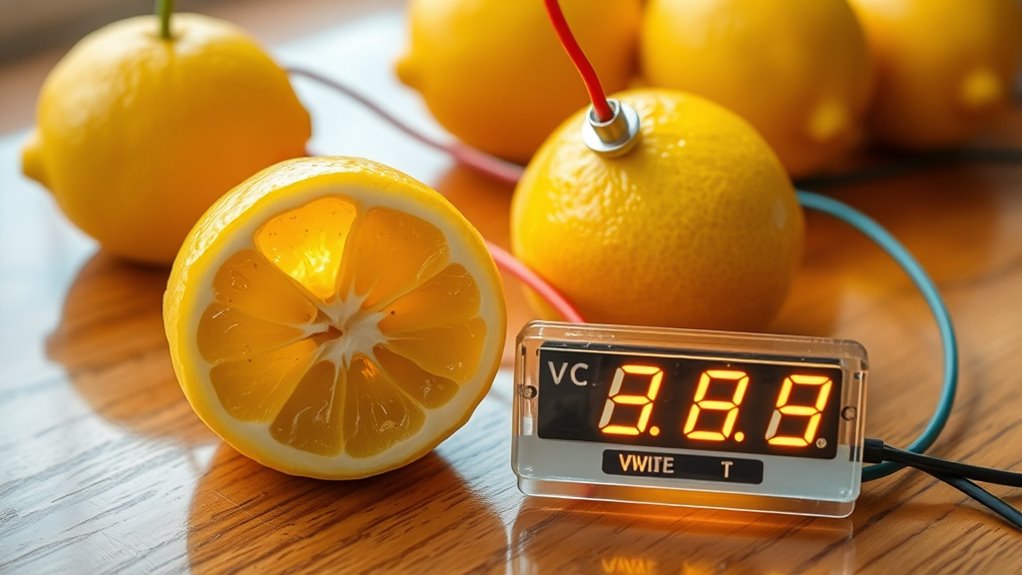
To guarantee your lemon battery works effectively, start by connecting the lemons in series using alligator clips, linking the copper penny of one lemon to the zinc nail of the next. This series connection adds up the voltage, so at least four lemons are recommended to reach about 4V for LED activation. Make sure alligator clips make secure metal-to-metal contact, and avoid internal contact within lemons to prevent short circuits. Before testing, roll the lemons to enhance juice flow and conductivity, which improves overall performance. When connecting your LED, attach the shorter leg (cathode) to the final electrode and the longer leg (anode) to the initial electrode, maintaining correct polarity. Use a multimeter to verify voltage, expecting around 0.9-1.1V per lemon. Checking the electrode materials ensures proper connectivity and optimal performance, as different metals can influence the voltage produced. Proper electrical contact is crucial, so follow manufacturer guidelines for maintenance to keep your setup functioning optimally. Additionally, ensuring consistent cookie preferences can help you monitor and optimize your overall project experience. Remember, the father-daughter bond can serve as an inspiring reminder of the importance of nurturing connections, even in scientific experiments.
Exploring Variations and Enhancements
Exploring variations and enhancements in your lemon battery can considerably improve its performance. Start by experimenting with different electrolytes, like vinegar or potato juice, to see how acidity levels affect voltage. Using fruits with higher acidity, such as oranges, can boost ion availability, increasing efficiency.
You can also try combining multiple electrolytes to leverage their unique chemical properties for better results. When it comes to electrodes, selecting metals like zinc or copper influences voltage and current. Adjusting electrode size and shape increases surface area, enhancing reactions.
Connecting multiple lemons in series raises voltage, while parallel setups boost current. Finally, testing various small devices, like LEDs or motors, helps you gauge your battery’s power and identify the best configuration for your needs.
Safety Tips and Best Practices

Safety is essential when working with a lemon battery to prevent accidents and guarantee a successful experiment. Always read safety precautions for all materials you use. Make sure metal components are clean and free of oil or fingerprints; wash them with mild detergent if needed. Wear safety goggles to protect your eyes from sparks or splashes. Handle sharp objects like knives and metal plates carefully to avoid injuries.
When setting up, insert electrodes properly without touching each other or the wires. Keep exposed wires away from your skin and eyes, especially if you have open wounds. Afterward, dispose of lemons properly and clean all materials. Wash your hands thoroughly and keep the workspace safe and out of reach of children.
Regularly check for corrosion or loose contacts to ensure safe operation.
Frequently Asked Questions
How Long Can a Lemon Battery Power an LED Before Fading?
You want to know how long a lemon battery can power an LED before fading. Typically, it lasts about an hour, depending on factors like evaporation, electrode placement, and environmental conditions.
As the lemon juice evaporates or electrodes oxidize, the power diminishes. To extend this time, you can enclose the setup to reduce evaporation and optimize electrode spacing, which helps maintain the LED’s brightness longer.
Can the Lemon Battery Be Reused After Its Initial Setup?
You wonder if you can reuse a lemon battery after its first use. The answer is yes, you can, but with limitations. Reusing involves cleaning electrodes, replacing zinc nails, and refilling juice, but efficiency drops over time.
Oxidation, lemon degradation, and electrolyte depletion reduce power. While you can extend its life temporarily, eventually, you’ll need to build a new battery for consistent performance.
What Factors Affect the Voltage Produced by the Lemon Battery?
You want to know what affects the voltage of your lemon battery. Factors like electrode material type, especially zinc and copper, influence voltage due to their redox potential difference.
The surface area of your electrodes, their cleanliness, and how well they contact the lemon juice matter too.
Additionally, the number of cells connected in series adds up the voltage.
Warmer lemons and higher acidity can also boost the voltage your setup produces.
How Does Temperature Influence the Lemon Battery’s Performance?
Temperature impacts your lemon battery’s performance mainly through reaction speed and internal resistance. Warmer conditions increase ion mobility and accelerate electron transfer, boosting current output.
Conversely, cold temperatures slow these processes, reducing voltage and current. Too hot, and you risk evaporation, lowering electrolyte volume.
Is It Possible to Store Power Generated From a Lemon Battery?
Imagine your lemon battery as a tiny river flowing with limited current. You can catch this flow with a small bucket, like a capacitor or a rechargeable battery, to store the energy.
While it’s possible, remember that the power is weak and unstable, so storage works best for small, low-voltage devices.
You’re fundamentally capturing a trickle of energy, not a flood, to keep your projects going.
Conclusion
Now that you’ve built your lemon battery, you’ve seen firsthand how simple materials can create a surprising amount of power. It’s a fun reminder that sometimes, the best things come in small packages. Keep experimenting and don’t be afraid to try different fruits or setups—you never know what sparks your curiosity. Remember, Rome wasn’t built in a day, so stay patient and keep exploring the electrifying world of electrochemistry!