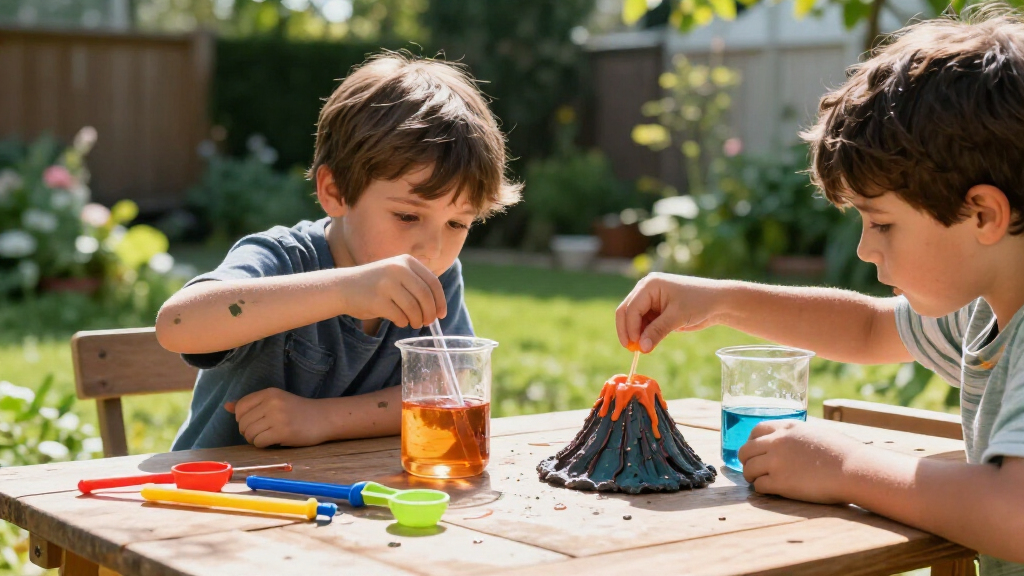
This guide helps a parent, caregiver, or teacher choose an educational science kit for a child and use it for a safe, hands-on activity. You will match a kit to the child’s age and interests, check what it contains, prepare a work area, guide the experiment, and talk through the results. It is written for beginners and takes about 30-60 minutes to choose and prepare a kit; the activity itself may take longer.

Prime made for students and young adults
- Fast, free delivery for dorm and study essentials
- Prime Video and Amazon Music included
- Member-only deals
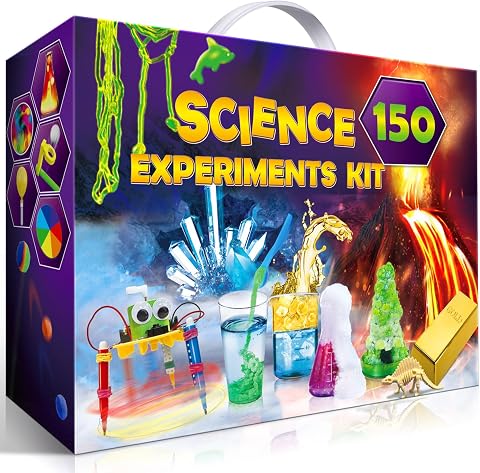
UNGLINGA 150 Experiments Science Kit for Kids – Chemistry Lab STEM Toys
- ✔ Brand: UNGLINGA
- ✔ Suggested age: 8 years and up
- ✔ Experiment count: 150

Doctor Jupiter Preschool Science Kit for Kids Ages 3-5, Birthday Gift
- ✔ Brand: Doctor Jupiter
- ✔ Manufacturer: Metis Learning Solutions Pvt. Ltd.
- ✔ Suggested age: 3+ years

National Geographic Junior Chemistry Set with 50 Experiments for Kids
- ✔ Brand: Blue Marble
- ✔ Suggested age: 4 years and up
- ✔ Experiment count: 50
The goal is not to complete the experiment as quickly as possible. A useful kit gives the child a chance to make a prediction, handle suitable materials, observe what happens, and explain what they noticed. Adult supervision, especially around small parts, heat, liquids, or chemicals, should match the kit instructions and the child’s abilities.
Difficulty: Beginner | Time: 30-60 minutes for selection and preparation; allow the activity time listed on the kit
What You’ll Need
Tools & Materials:
- The science kit and its instruction booklet
- A clear, wipeable work surface
- Any household materials named in the instructions
- Paper and a pencil for predictions and observations
- A tray or shallow container to catch spills, if the activity uses liquids or small parts
- Adult supervision appropriate to the child’s age and the activity
Knowledge:
- Read and follow the kit’s age label and safety directions
- Help the child follow a sequence of simple instructions
- Pause the activity if a material or step is unclear
Read the full activity before opening packets or mixing materials. Check the kit’s age range, supervision notes, and any allergy, choking, eye-protection, ventilation, or disposal warnings. Do not substitute household ingredients or combine kit materials with other products unless the instructions say to do so. If the kit is a gift, check that its contents are complete and that the child can use it with the supervision available.
UNGLINGA 150 Experiments Science Kit for Kids – Chemistry Lab STEM Toys
For families seeking an at-home science set with room to move between subjects, UNGLINGA is our broadest pick. Its 150 stated experiments cover chemistry, physics, earth science, and other areas, giving it a wider learning scope than the National Geographic set, which is specifically framed around chemistry. That variety can help children follow changing interests instead of repeating one kind of activity.The kit is designed for ages 8 and up and includes tools, goggles, materials, and an illustrated step-by-step guide. Together, those components make it a more self-contained starting point than an activity plan that assumes families will assemble the equipment themselves. The guide’s illustrated format can also help children follow a sequence and connect what they do with what they observe, though younger users may still need an adult nearby.The tradeoff is that the stated inclusion of materials does not mean every experiment is ready to begin straight from the box. Some activities may require common household items, and the description says those items may not be listed in the kit. Compared with Doctor Jupiter’s preschool-oriented sensory activities, this set asks for a more school-age level of interest and follow-through. It makes the most sense for children ready for variety, while families who want a clearly defined preschool introduction should look to Doctor Jupiter instead.
Pros:
- States 150 experiments across chemistry, physics, earth science, and other topics.
- Includes experiment tools, goggles, and materials.
- Illustrated instructions provide a step-by-step activity path.
- Its broader subject mix offers more variety than the chemistry-focused National Geographic set.
Cons:
- Some experiments may need household items that are not included.
- The suggested age of 8 and up makes it a poor match for the preschool audience served by Doctor Jupiter.
- A high activity count does not establish how much preparation each experiment requires.
Best for: Families with children ages 8 and up who want activities across several science subjects and appreciate having core tools and goggles included.
Not ideal for: Preschoolers, children who want only chemistry activities, or families looking for a kit where every experiment’s supplies are confirmed to be in the box.
Bottom line: Choose UNGLINGA when broad subject variety matters most and your child is ready for a school-age science set that may occasionally call for supplies from home.
“Choose UNGLINGA when broad subject variety matters most and your child is ready for a school-age science set that may occasionally call for supplies from home.”
Doctor Jupiter Preschool Science Kit for Kids Ages 3-5, Birthday Gift
When the learner is still in preschool, age fit matters more than maximum complexity. Doctor Jupiter is described for children ages 3 and up, with activities introducing colors, bubbles, motion, sound, and simple reactions. That makes it the most clearly early-learning-oriented option in this lineup, compared with UNGLINGA’s stated age of 8 and up and the National Geographic set’s chemistry emphasis for ages 4 and up.The activity mix is sensory and approachable: the listed components include cups, a color-mixing tray, a bubble wand, a spray bottle, aroma bags, and a snowman mold. Food-grade materials and illustrated instructions are intended to support parent-child exploration. Online activity access adds another source of guidance, while the screen-free experiments themselves give families hands-on ways to talk about what children see, hear, and feel.Its limitation is the same quality that makes it approachable: the kit focuses on basics. A child who is ready for a wider range of subjects may find UNGLINGA more engaging, and someone seeking a dedicated set of chemistry tools may prefer National Geographic’s 20-plus lab tools. Doctor Jupiter is the better match when simple, guided discovery is the goal, but it may be outgrown as a child seeks deeper explanations and more demanding experiments. The description gives a broad experiment count but does not specify the supply needs of each activity, so parents should review instructions in advance.
Pros:
- Designed for ages 3 and up, the youngest stated age range in this comparison.
- Introduces colors, bubbles, motion, sound, and simple reactions.
- Lists child-safe, food-grade materials and illustrated step-by-step instructions.
- Includes online activity access alongside screen-free hands-on play.
Cons:
- Its basic activity level may not hold the interest of older or more experienced children.
- It is less suited to broad subject exploration than UNGLINGA.
- The supplied description does not itemize the extra materials, if any, needed for each activity.
Best for: Parents or caregivers introducing science through guided, sensory activities with children ages 3 to 5.
Not ideal for: Older children who want more advanced experiments, a broad multi-subject science program, or a deeper chemistry focus.
Bottom line: Pick Doctor Jupiter for a first science kit built around simple, sensory parent-child activities, with the understanding that curious older children may want more challenge.
“Pick Doctor Jupiter for a first science kit built around simple, sensory parent-child activities, with the understanding that curious older children may want more challenge.”
National Geographic Junior Chemistry Set with 50 Experiments for Kids
Some young learners would rather repeat a favorite kind of discovery than jump among several branches of science. This set gives chemistry the center stage, with 50 hands-on experiments and more than 20 child-safe lab tools. For a child drawn to beakers, mixing, and observing reactions, that focus is a clearer fit than UNGLINGA’s wider mix of physics, earth science, and chemistry.Its stated age range begins at 4 years, placing it between Doctor Jupiter’s preschool focus and UNGLINGA’s 8-and-up guidance. Illustrated instructions are intended to make the activities accessible to young learners, and the included goggles and tools create a recognizable lab-play setup. The description says the experiments use everyday household items, which may make activities easier to stage when those supplies are on hand, but it also means families should anticipate setup and possible cleanup.Compared with Doctor Jupiter, this is the more chemistry-specific choice, while Doctor Jupiter offers a broader set of sensory themes for very young children. The tradeoff is that the National Geographic set is described as covering basic chemistry, so older children seeking more advanced science or a wider subject range may prefer UNGLINGA. Household chemicals can also be messy; adults should check each activity’s directions, prepare the workspace, and decide what support a child needs before beginning.
Pros:
- Focuses on 50 hands-on chemistry experiments.
- Includes more than 20 child-safe tools and safety goggles.
- Illustrated instructions are designed for young learners.
- Uses everyday household items, according to the description.
Cons:
- Household chemicals used in experiments can create mess and require preparation.
- The activities are described as basic chemistry and may not challenge older children.
- It offers less subject variety than UNGLINGA’s cross-discipline set.
Best for: Families with children ages 4 and up who are especially interested in chemistry and enjoy guided lab-style activities.
Not ideal for: Children looking for varied science subjects or advanced chemistry, and families who want activities without household supplies or potential mess.
Bottom line: Choose this set when chemistry itself is the draw and a child is ready for guided lab-style play, provided household supplies and cleanup are manageable.
“Choose this set when chemistry itself is the draw and a child is ready for guided lab-style play, provided household supplies and cleanup are manageable.”
As an Amazon Associate we earn from qualifying purchases.
Before You Start
Put safety first. Follow the kit’s own instructions whenever they give more specific directions than this guide. Keep materials away from food, drinks, pets, and younger children. Do not taste kit materials. Have the child wash their hands after the activity, and clean the work surface as directed. If the kit calls for an adult-only task, such as using a sharp tool or handling a hot item, the adult should do that part.
Set aside enough time to finish the activity and clean up. Some projects need waiting time or several sessions, such as growing crystals or observing seeds. Check those timing requirements before choosing the activity so the child knows what to expect.
Step-by-Step Instructions
Step 1: Choose a kit that fits the child
Match the kit to the child’s age, interests, and ability to follow instructions. Read the age range on the package, then check whether the activities match what the child enjoys: building, animals, plants, space, weather, magnets, or simple chemical reactions. Choose a kit with clear instructions and activities that invite the child to observe or make choices, rather than only assemble a finished object.
Plan for the help the child will need. Give a younger child a role such as sorting, pouring with adult help, or watching a change happen. Give an older child a chance to measure, keep a record, or compare results. Pick a kit that gives the child a meaningful role while leaving any risky or difficult tasks to an adult.
Tip: Use the printed age range as a starting point, not a promise that every activity is suitable without help. Check the individual activity directions and warnings.
Check: You can describe why the kit suits the child’s age, interests, and available supervision.
Step 2: Check the contents and safety information
Read the product description and safety notes before buying or opening the kit. Check whether the kit includes all parts or expects you to supply household items. Look for clear warnings about small pieces, liquids, powders, magnets, batteries, sharp tools, or protective equipment. Confirm that you can provide any extra materials before planning the activity.
Compare the kit contents with the parts list after opening it. Keep small components in their labeled containers, and store anything unsuitable for the child to handle out of reach. Stop and contact the seller or maker for guidance if a packet is leaking, a part is damaged, or a safety direction is missing.
Tip: Do not assume that a kit labeled for children is safe to use without an adult. Read the supervision directions for the particular experiment.
Check: The required parts are present, the safety directions are readable, and you know which tasks require adult help.
Step 3: Select one experiment and read it through
Choose a single activity for the first session. Read every step from start to finish before setting out materials. Note the estimated activity time, any waiting period, and the cleanup directions. Check whether the experiment needs a specific room temperature, sunlight, water, or another condition.
Explain the activity to the child in a short, concrete way: what you will make or observe, what they can do, and which parts the adult will handle. Invite the child to ask questions before starting. Pause and check the kit maker’s information if a direction seems unclear; do not guess or improvise.
Tip: Some activities need repeated observations across several days. Choose one with a time commitment the child can follow through on.
Check: You and the child can describe the activity, the order of the main steps, and any waiting time.
Step 4: Prepare the workspace and materials
Clear a stable work surface and cover it with a washable mat or tray if the activity could spill. Move food, drinks, unrelated toys, and clutter away. Gather only the items named in the selected experiment. Place the instructions where both you and the child can see them, and arrange the materials in the order you will use them.
Set out any required protective equipment, such as goggles, if the kit specifies it. Keep cleanup supplies nearby, but place them where they cannot be confused with experiment materials. Have the child wash their hands and explain which items are for the experiment and which are for cleanup.
Tip: A tidy setup makes it easier to notice missing parts and reduces the chance of using the wrong item.
Check: The work area is stable and clear, the listed materials are ready, and the child knows where to work.
Step 5: Invite a prediction before the experiment
Ask the child what they think will happen and why. Accept a short answer, a drawing, or a choice between possibilities. Write the prediction on paper or ask the child to draw it. Avoid telling them which outcome is correct; the prediction gives them something to compare with their observations.
Keep the question tied to the experiment. For example, ask which object they think a magnet will attract or what they expect a seed to need in order to grow. Explain that changing a prediction after seeing the result is part of learning, not a mistake.
Tip: If the child is unsure, offer two reasonable possibilities and ask which one they want to test.
Check: The child has made or recorded a prediction before seeing the result.
Step 6: Guide the child through the instructions
Follow the kit directions in order and let the child do the safe parts, such as counting pieces, observing, or pouring when permitted. Read one step at a time, then pause so the child can complete it. Keep adult-only tasks in adult hands. Do not let the child handle materials in a way the safety instructions prohibit.
Ask the child to describe what they see, hear, or notice as the activity proceeds. Use simple prompts such as “What changed?” or “Which part looks different?” Give the child time to answer before offering an explanation. If the activity does not behave as expected, continue only if the instructions allow it and the setup remains safe.
Tip: Avoid rushing to correct every small difference from the expected result. First check whether the child followed the steps and what they observed.
Check: The activity was completed in the printed order, with the required supervision and safety steps.
Step 7: Compare the result with the prediction
Ask the child to describe what happened, then compare the result with their original prediction. Record a few observations in words or pictures. If the kit asks for measurements, help the child use the stated units and write down the values as shown. Keep observations separate from guesses: “the paper clip moved” is an observation; “the magnet is stronger” is an explanation to discuss.
Discuss one possible reason for the result using the kit’s explanation, if it provides one. If the activity produced a different outcome, check the directions and conditions together. Do not claim the experiment proved more than it tested. A single result can prompt another question, but it may not answer every question about the topic.
Tip: Treat an unexpected result as useful information. Ask what one condition you could check or change in a later trial.
Check: The child can describe at least one observation and say whether it matched their prediction.
Step 8: Clean up and store the kit
Follow the kit’s cleanup and disposal directions. Have the adult handle any materials the instructions identify as requiring special care. Put reusable parts away in their labeled containers, and store the kit where younger children and pets cannot reach it. Wipe the work surface and have everyone wash their hands.
Label the project with the date and the next observation time if the activity continues over time. Keep any ongoing setup in the location specified by the kit, away from food preparation and out of reach of children who are not taking part. Do not save a mixture or solution unless the directions say it can be stored.
Tip: Keep the booklet with the kit so the next session includes the correct instructions and disposal information.
Check: The area is clean, materials are stored or discarded as directed, and any ongoing project has a clear next observation time.
Common Mistakes to Avoid
- Choosing a kit based only on its cover or advertised age. — Read the activity details, supervision notes, and materials list. Match the tasks to the child’s abilities and the adult help available.
- Opening packets or mixing materials before reading the full activity. — Read the instructions and safety information from start to finish first. Set out only the materials needed for the chosen experiment.
- Doing every step for the child or letting them handle adult-only tasks. — Give the child safe roles such as observing, counting, or recording. Keep any task marked for adult supervision with the adult.
- Treating an unexpected result as failure. — Record what actually happened, check the steps and conditions, and use the difference to form a new question.
Troubleshooting
Problem: A listed part or household material is missing.
Solution: Pause before starting. Check the packaging and parts list, then contact the kit maker or seller if a kit component is absent. Use a substitute only if the instructions approve it.
Problem: The experiment gives a different result from the booklet.
Solution: Check measurements, order, timing, and environmental conditions against the directions. Record the result. Repeat only if the instructions allow it and the activity remains safe.
Problem: The child loses interest or finds the instructions hard to follow.
Solution: Pause and restate the next action in simpler words. Offer a safe role, such as observing or drawing. If the activity has several stages, stop at a safe point and return later if the kit permits it.
Problem: A spill, irritation, or damaged packet occurs.
Solution: Stop the activity and keep the child away from the material. Follow the kit’s spill or exposure directions and seek appropriate medical or emergency help if needed. Do not continue until the source of the problem is addressed.
What Success Looks Like
The task is complete when you have selected a kit suited to the child’s age and interests, checked the materials and safety directions, and guided one activity from setup through cleanup. The child should be able to describe what they observed and compare it with their prediction. The work area should be clean, kit parts should be stored or discarded as directed, and any activity that continues over time should have a clear next observation point.
Next Steps
Ask the child what they would like to test next, then choose another activity that builds on their observation. For a repeat experiment, change only one condition at a time when the kit instructions allow it, and write down what changed. Return to ongoing projects at the times stated in the booklet. Check the kit’s storage directions after each session, and replace or retire damaged materials before using it again.
If the child wants to explore the topic further, use a library book or a trusted educational resource to answer the next question together. Keep the explanation connected to what the child observed, and let the child help plan the next safe test.
Frequently Asked Questions
How do I choose the right age range for a science kit?
Start with the age range printed on the kit, then read the activity directions and supervision notes. Consider whether the child can follow the steps and handle the parts safely with the adult help available. When in doubt, choose an activity with simpler materials and a clear adult role.
Can I replace a missing ingredient with something from home?
Only substitute a material when the kit instructions explicitly allow it. A replacement can change the result or introduce a safety risk. If a kit part is missing, contact the seller or maker before proceeding.
What should I do if the experiment does not work?
Record what happened, then check the order of steps, measurements, timing, and any required conditions. If the directions permit a repeat, try again while checking one likely source of difference. An unexpected result can still give the child something useful to observe.
Should I let my child complete the experiment alone?
Follow the kit’s supervision directions and use your judgment about the child’s abilities. Stay present for any activity involving small parts, liquids, powders, tools, heat, batteries, or other materials that need supervision. Complete adult-only steps yourself.
How can I help my child learn from a kit without giving them the answer?
Ask what they predict, what they notice, and how the result compares with their prediction. Give them time to explain in their own words or draw what happened. Use the kit’s explanation afterward to connect their observation to the science idea.