
TL;DR
Soundproofing a closet isn’t just about foam — sealing gaps, controlling vibration, and strategic placement are key. A closet can be a quiet haven if you treat it right, but ventilation and heat management are critical for continuous operation.
Ever notice how a noisy rig seems a lot less bothersome when it’s behind a thick door? That’s because proper placement and treatment can turn a tiny closet into a surprisingly effective sound barrier. But it’s not just about slapping foam on the walls. The real magic lies in understanding what works and what doesn’t when it comes to acoustic dampening and isolation.
This article reveals how to make your closet a quiet space, whether it’s for a home studio, a rig in a shared office, or just reducing heat and noise from a high-powered AI workstation. You’ll learn the secrets of placement, sealing gaps, and the best way to treat small spaces for maximum soundproofing and heat dissipation. For more on managing acoustic environments, see acoustic dampening, placement, and the ‘Rig in the Closet’ setup.
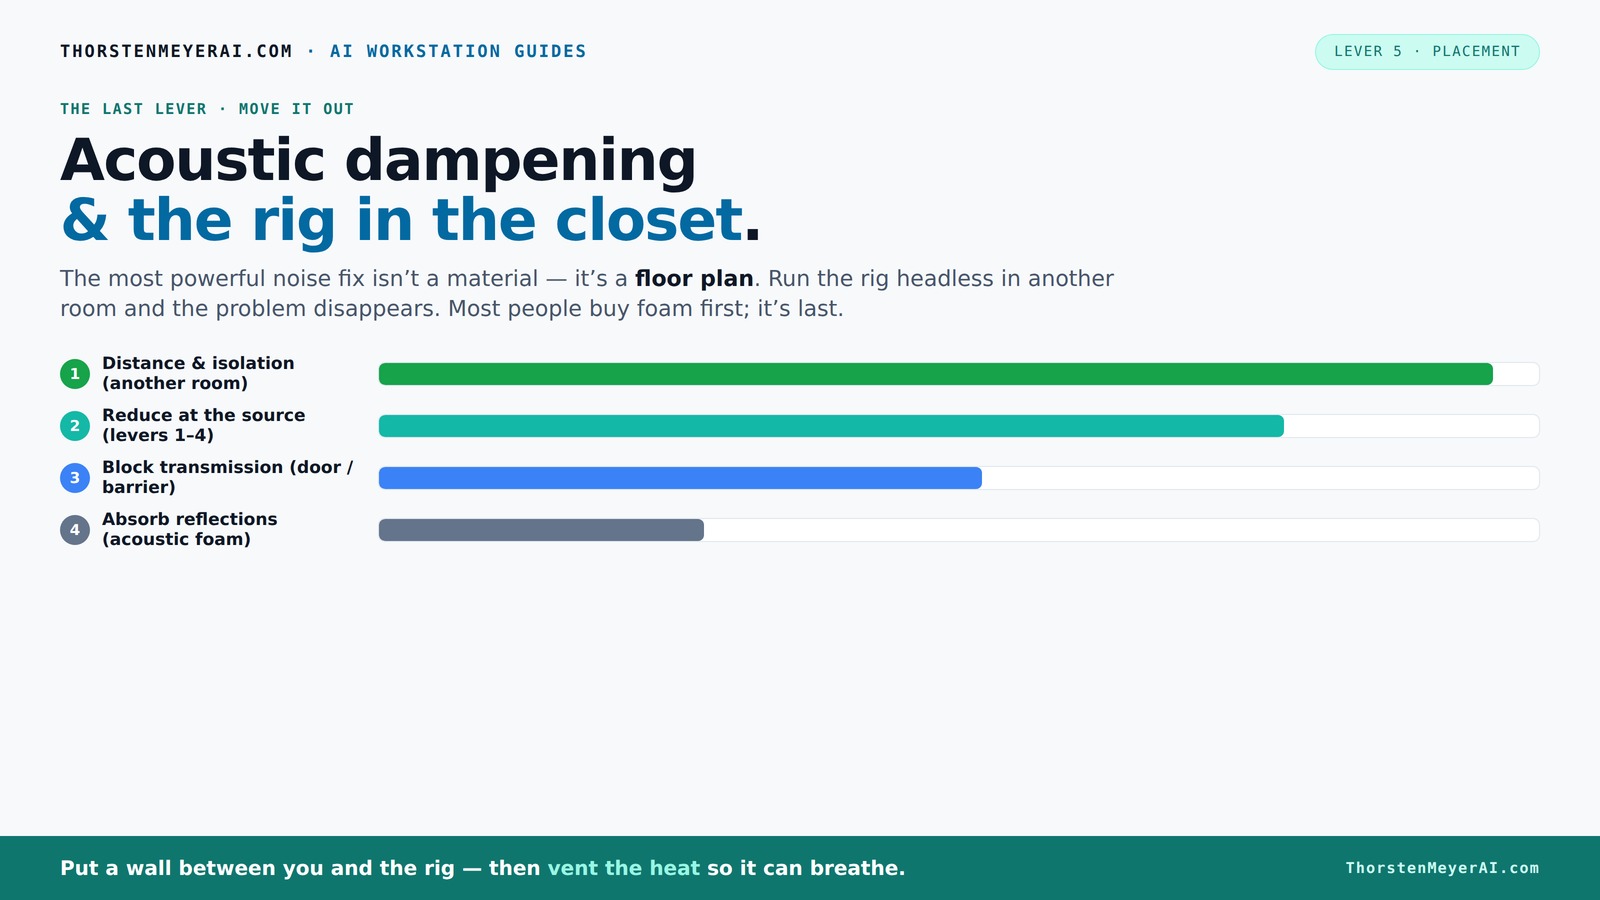
Acoustic dampening
& the rig in the closet.
The most powerful noise fix isn’t a material — it’s a floor plan. A rig you can’t hear because it’s in another room beats any amount of foam. Tap the approaches in Part 1 to see what actually works.
(another room)
(levers 1–4)
(door / barrier)
(acoustic foam)
Contain the noise, not the heat
Key Takeaways
- Sealing gaps and treating corners are essential in a tiny closet for effective soundproofing. Learn more about acoustic dampening, placement, and the 'Rig in the Closet' setup.
- Placement at reflection points and corners dramatically improves acoustic quality.
- Ventilation is critical in a sealed closet to prevent heat buildup and hardware throttling.
- Combine vibration isolation with absorption for true silence, especially with heavy rigs.
- Start small with DIY fixes; upgrade as your needs and budget grow.
12 Pack Self-Adhesive Acoustic Panels, 12" X 12" X 0.4" High-Density Sound Proof Foam Panels for Walls, Soundproof Wall Panels for Home & Office (Black)
Superior Noise Reduction & Echo Cancellation - Tired of background noise and poor acoustics? Our soundproof wall panels...
As an affiliate, we earn on qualifying purchases.
As an affiliate, we earn on qualifying purchases.
Why Acoustic Treatment Isn’t the Same as Soundproofing
Many think adding foam panels will turn their closet into a soundproof booth. In reality, acoustic dampening mainly softens reflections and echoes inside a space, making it sound better. Soundproofing, on the other hand, blocks sound from leaking out or in.
For your rig, this means sealing gaps around the door, adding mass to walls, and stopping vibration transmission are more effective than just lining the space with foam.
Imagine shouting into a soft pillow—inside, it sounds muffled. But to keep sound from escaping, you need a sealed pillowcase, not just a fluffy cover. The same applies to closets. It’s about sealing and damping at the boundaries.
Understanding this distinction helps you prioritize your efforts: focusing on sealing and vibration control yields more noticeable noise reduction than solely adding absorption materials.

Focusound 52 Pack Acoustic Foam Panels 1" x 12" x 12" Sound Proof Foam Panles Soundproofing Noise Cancelling Wedge Panels for Home Office Recoding Studio with 300PCS Double-Side Adhesive
Soundproofing - Acoustic foam panels triangular grooves structure for better noise absorption, helps to reduce and absorb unwanted...
As an affiliate, we earn on qualifying purchases.
As an affiliate, we earn on qualifying purchases.
Best Placement Strategies for Your Closet Rig
Where you put your gear and how you treat the room make all the difference. Start by identifying the first reflection points—these are the spots where sound bounces directly from your speakers or mic toward the walls. Placing panels there reduces early reflections that cause muddiness and comb filtering, resulting in clearer sound.
In tight spaces, corners are low-frequency hot spots. Adding bass traps or corner panels can tame those boomy sounds—imagine stuffing a pillow into each corner to absorb the deep rumble. This prevents low-frequency energy from building up and causing muddiness or vibration issues.
For a closet, aim to place panels at ear height on side walls, and consider ceiling treatment to prevent sound from bouncing upward and creating flutter echoes. Proper placement minimizes sound bouncing around, ensuring your gear receives a cleaner, more controlled audio environment. This strategic approach improves both sound quality and noise isolation.

Audimute Soundproofing Acoustic Door Seal Kit - Door Sweep and Seal - (Standard Size)
Includes a Door Seal (3/16" x 1/2" x 25') and a Door Sweep (1/2" x 1.5" x 4').
As an affiliate, we earn on qualifying purchases.
As an affiliate, we earn on qualifying purchases.
Treating the Closet Door, Gaps, and Corners for Real Noise Reduction
The closet door is often the weakest link in soundproofing. A hollow or thin door allows sound to leak easily, undermining your efforts. For effective door treatment solutions, see acoustic dampening, placement, and the 'Rig in the Closet' setup.
Sealing gaps around the edges—top, bottom, and sides—turns the door into a more effective barrier. Using acoustic sealant or weatherstripping prevents sound from slipping through tiny openings, which are often overlooked but can dramatically reduce leakage.
And don’t forget the corners. Low frequencies tend to pile up there because they reflect and resonate within enclosed spaces. Installing bass traps or DIY corner fill-ins with rockwool can drastically reduce boomy sound, improve clarity, and prevent low-end buildup that causes muddiness. Proper corner treatment ensures your sound remains tight and controlled across the entire frequency spectrum.

LBG Products Rubber Anti-Vibration Isolator Pads,Heavy Duty Blue EVA Pad for Air Conditioner,Compressors,HVAC,Treadmills etc (3'' X 3'' X 7/8'')
【 ✅ANTI VIBRATION】:4 Pack of Anti Vibration Pads which are used to reduce noise and shock absorption of...
As an affiliate, we earn on qualifying purchases.
As an affiliate, we earn on qualifying purchases.
How Much Treatment Is Enough? Covering Your Closet for Best Results
In small closets, more is better—up to a point. Covering nearly all interior walls with acoustic panels or foam can turn the space into a dead sound chamber, which might reduce echo but can also make the room sound unnaturally dull and lifeless. For tips on optimal acoustic treatment, see acoustic dampening, placement, and the 'Rig in the Closet' setup.
For a tiny closet, aim to treat at least 60-80% of the surfaces, especially at reflection points and corners where sound energy tends to concentrate. Using thicker panels (around 2 inches) enhances low-frequency absorption, which is crucial in small, confined spaces where bass buildup is common.
Imagine lining your closet with dense foam, blankets, and wall panels—this creates a mini acoustic environment that minimizes vibrations and reflections. Thoughtful coverage ensures sound is absorbed efficiently without over-damping, leading to a balanced soundproofed space that’s neither echoey nor dull. This DIY approach, when done correctly, can rival professional treatments, provided you understand where and how much to treat.
How to Keep Your Rig Cool in a Sealed Closet
Putting a high-power rig in a sealed closet sounds perfect for noise reduction—until heat becomes a problem. To learn about effective cooling solutions, see acoustic dampening, placement, and the 'Rig in the Closet' setup.
Install passive vents or quiet exhaust fans that can circulate air without introducing noise. For more advanced setups, consider soundproof cabinets with built-in cooling systems—these combine insulation with active airflow, ensuring your hardware stays cool without sacrificing soundproofing.
Imagine a closet with a small, quiet fan pulling hot air out while drawing in cool air through a vent—this balanced airflow prevents overheating while maintaining noise isolation. The key is designing a system that effectively dissipates heat without creating leaks that compromise your soundproofing efforts.
Combining Vibration Control and Soundproofing for Maximum Silence
Heavy equipment, like rigs or HVAC units, transmit vibrations through the structure, which can be heard as low-frequency hums or rattles. Isolating the source with rubber pads, anti-vibration mounts, or floating floors reduces the transmission of these vibrations into the walls and floors, significantly lowering structural noise.
Imagine placing your tower on rubber feet or mounting it on a decoupling pad—these tiny tweaks break the mechanical connection that transmits vibrations. This is especially important in small, enclosed spaces where vibrations tend to resonate and amplify.
Pair vibration isolation with sealing gaps and adding absorbent panels inside, and you’re creating a fortress of silence inside your closet. This comprehensive approach tackles both airborne noise and structural vibrations, resulting in a much quieter environment overall.
DIY Setup vs. Upgraded Closet Studio: What's Worth It?
Starting simple? Use blankets, weatherstripping, and a few foam panels. It’s cheap and quick, perfect for testing if your closet can handle the job. These solutions provide basic noise reduction and are easy to implement, but they may not offer optimal long-term performance.
For better results, invest in thicker panels, sealed doors, and active ventilation. These upgrades improve both soundproofing and heat management, making your space more professional and reliable for extended use.
Big budget? Consider custom soundproof cabinets, full wall treatments, and professional-grade damping materials. These can turn a noisy closet into a near-studio-quality space, suitable for recording or critical listening. Think of it as building a sound fortress: start with a tent, then upgrade to a castle as your needs grow.
Frequently Asked Questions
Can a closet really work as a vocal booth or mini studio?
Absolutely. With proper sealing, absorption, and corner treatment, a closet can be transformed into a surprisingly effective vocal booth or small studio, especially if you focus on first reflection points and door sealing [1][4].What’s the difference between acoustic dampening, acoustic treatment, and soundproofing?
Acoustic dampening reduces echoes and reflections inside a space, while soundproofing blocks sound from escaping or entering. Treating a closet involves both—absorbing internal reflections and sealing gaps for effective isolation [1][3].Where should panels go in a closet setup?
Place panels at first reflection points—sides, ceiling, and possibly the door—especially at ear level. Bass traps in corners and sealing gaps around the door enhance the overall soundproofing and clarity [2][5].Do I need to treat the ceiling, door, and corners too?
Yes. The ceiling can cause flutter echo, and the door is usually the weakest point for leaks. Corners trap low frequencies, so adding bass traps there improves low-end control and overall sound quality [5][7].How many panels do I need for a small closet?
Treat at least 60-80% of the surfaces, focusing on reflection points and corners. For a tiny closet, a handful of thick panels (around 2 inches) placed strategically can make a huge difference [4][6].Conclusion
Remember, the goal isn’t just to muffle sound—it's to create a space where noise doesn’t bother you. A well-treated closet with proper sealing, placement, and ventilation can become your secret weapon for quiet, focused work.
Think of it as turning a noisy closet into your own sound fortress—quiet, cool, and ready for whatever project you throw at it. The best part? You don’t need a studio—just a little know-how and some DIY spirit.