This checklist is for teachers, students, and home science learners gathering practical lab essentials for classroom activities, demonstrations, or personal projects. Use it to think through safety, measurement, containers, and recordkeeping before assembling a workspace.

Prime made for students and young adults
- Fast, free delivery for dorm and study essentials
- Prime Video and Amazon Music included
- Member-only deals
The sections follow those jobs in a simple order: protective gear first, then clothing, measurement, glassware, slides, and notebook supplies. Some entries name a product pick; others offer advice only, so consider your specific activities and any guidance from your school or lab supervisor.
Before buying, check the product details and compare them with your intended use, workspace, and storage needs. Treat each pick as a starting point, and prioritize fit and compatibility with your procedures. For classroom use, confirm that the item is permitted and suitable for the activities planned.
Safety Goggles
Eye protection belongs near the top of a lab checklist because activities may involve splashes, particles, or other hazards. The named pick is the 3M Chemical Splash/Impact Resistant Safety Goggle, 1 Pack. Before choosing it, check the product information against the hazards and rules for the activities where it will be used; the product name alone does not establish suitability for every lab task.
A common mistake is buying goggles based on appearance or a broad label without checking how they fit the wearer or work with other equipment. Consider who will use them, whether they sit comfortably and securely, and whether they can be worn alongside any required eyewear. For a shared classroom, account for different face sizes and have a plan to check fit for each user. Follow the manufacturer’s care and use instructions, and replace or set aside goggles if they are damaged or no longer fit properly.
What to look for:
- A fit that stays secure for the intended wearer
- Product details that match the activity’s hazards and lab rules
- Compatibility with required eyewear
- Clear care and use instructions
- Condition and fit checks before each use
3M Chemical Splash/Impact Resistant Safety Goggle, 1 Pack
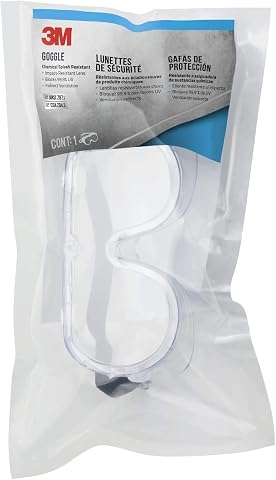
These safety goggles from 3M provide impact and splash protection with a polycarbonate lens and comfortable elastic headband. Designed to fit over most prescription eyewear, they feature vents to reduce fogging and meet ANSI Z87.1-2003 standards, making them suitable for various workplace tasks.
Pros:
- Provides impact and splash protection with durable polycarbonate lenses
- Comfortable elastic headband ensures a secure fit
- Vents help reduce fogging for clear vision during use
- Fits over most prescription glasses
Cons:
- No adjustable temple; may not fit all head sizes comfortably
- Limited color options available
Best for: learners whose activities call for splash- and impact-resistant goggles
Not ideal for: anyone who has not confirmed fit and task suitability
Bottom line: Check the activity requirements and wearer fit before adding these goggles to the lab kit.
Lab Coat
A lab coat can help define a layer of clothing for lab activities, but the right choice depends on the work, local rules, and the wearer. Since this slot has no product pick, start by checking the school or lab’s guidance on garment style, materials, coverage, and laundering. Those requirements should guide the purchase rather than a generic checklist recommendation.
Common mistakes include choosing a coat that restricts movement, has sleeves that interfere with tasks, or is difficult to fasten and remove. Think about who will wear it and what clothing may go underneath. Check measurements against the maker’s sizing chart and consider a comfortable range of motion at the shoulders and arms. For a group, plan for multiple sizes rather than assuming one garment will suit everyone. Keep storage and cleaning practical for the setting, and follow the lab’s procedures for when the coat should be worn and how it should be handled after use.
What to look for:
- Lab or school requirements for coat style and materials
- Sizing chart measurements for each wearer
- Comfortable movement through the shoulders and arms
- A fastening style that works for the intended use
- Practical laundering and storage instructions
Digital Scale
A digital scale is useful when an activity calls for measured quantities, so matching its capacity and displayed precision to the task matters. The listed pick is the Bonvoisin Digital Lab Scale 600g x 0.01g Precision Electronic Scale LC. The product name gives a capacity and increment; review the full product details and your procedure to decide whether those specifications are appropriate for the materials and quantities involved.
A frequent buying mistake is treating a finer displayed increment as proof that a scale suits every measurement task. Check the weighing range, the size and type of items you plan to weigh, and any operating requirements in the product instructions. Also consider where the scale will sit: a stable, level workspace and enough room to place containers can make setup easier. For classroom use, think through container compatibility and how users will follow the same weighing procedure. Avoid choosing solely by the word “precision”; the activity’s measurement needs should determine the fit.
What to look for:
- Capacity suited to the quantities in your procedures
- Displayed increment appropriate for the task
- A stable, level place for setup
- Enough weighing surface for intended containers
- Operating instructions that users can follow
Bonvoisin Digital Lab Scale 600g x 0.01g Precision Electronic Scale LCD Display

This digital lab scale offers high precision measurements up to 600g with 0.01g accuracy, featuring multiple unit conversions and a clear LCD display. It includes functions such as tare, counting, and auto-off, making it suitable for scientific and jewelry applications.
Pros:
- High precision with 0.01g accuracy
- Multiple unit conversions for versatile use
- Clear LCD display for easy reading
- Tare and counting functions enhance usability
Cons:
- Calibration weights are not included
- Requires batteries or AC power (not included)
Best for: activities whose measurement needs fit the named capacity and increment
Not ideal for: tasks requiring specifications not confirmed in the product details
Bottom line: Compare the scale’s specifications with your procedure before relying on it for measurements.
Glass Beakers
Containers are easy to overlook when assembling a lab kit, yet their shape, material, and capacity need to suit the activity. The named pick is a Borosilicate Glass Breast Milk Pitcher with Upgraded Mixer, 32oz. Its name describes a pitcher, so do not assume it is interchangeable with a laboratory beaker; inspect the product details and confirm that your instructor or procedure permits it for the intended use.
A common mistake is choosing glassware by material alone and overlooking form, markings, pouring needs, or compatibility with the task. Consider whether the vessel’s capacity works for the quantities involved and whether its shape supports the way users need to mix, hold, or transfer contents. Check care and handling instructions, and verify any restrictions for the materials or conditions in your activity. In a classroom, make sure the item can be identified and handled consistently by users. Prioritize purpose and procedure fit over a familiar-sounding material name.
What to look for:
- A vessel type accepted for the intended procedure
- Capacity suitable for planned quantities
- Shape that supports the required mixing or transfer
- Product details on care and handling
- Compatibility with the materials and conditions involved
Borosilicate Glass Breast Milk Pitcher with Upgraded Mixer, 32oz

This 32oz borosilicate glass pitcher is designed for safe and durable breast milk storage and mixing. It features a redesigned mixer for smooth blending, a time dial to track freshness, and is easy to clean, making feeding routines more organized and stress-free.
Pros:
- Durable borosilicate glass withstands temperature changes
- Redesigned mixer ensures smooth, clump-free blending
- Time dial helps track milk freshness easily
- Large capacity suitable for multiple feedings
Cons:
- Not microwave safe
- All components not specified for dishwasher use
- No detailed dimensions provided
Best for: buyers whose procedure permits this pitcher’s form and capacity
Not ideal for: anyone who specifically needs a laboratory beaker without confirming equivalence
Bottom line: Confirm that the pitcher is permitted and suitable before treating it as lab glassware.
Microscope Slides
Slides should match the microscope activities you plan to perform, which makes this an advice-only checklist slot. Begin with the microscope’s instructions and the needs of the lesson or project. Check what slide format and preparation approach are expected, and ask the instructor or lab supervisor if the requirements are not clear. That avoids ordering a format that does not fit the activity.
Common mistakes include assuming all slides work for every specimen or overlooking how they will be prepared, labeled, handled, and stored. Consider who will use them, how many are needed for the planned work, and what accessories or procedures the activity requires. For group settings, choose a consistent format based on the equipment and instructions so learners are not left guessing. Check product dimensions and handling guidance before buying, and align any covers or preparation materials with the microscope and procedure. Keep the selection straightforward: let the actual lesson determine the slide choice.
What to look for:
- Format specified by the microscope or lesson instructions
- Dimensions compatible with the equipment
- Preparation requirements for planned specimens
- Handling and storage guidance
- Any covers or accessories required by the procedure
Lab Notebook
A notebook gives learners a place to keep observations and procedure notes together, so its format should support the way the lab work is recorded. The named pick is the Vela Sciences Advanced E7-C Expanded Hardcover Lab Notebook, 9.25 x 11. Review its layout and product details to see whether they match the recordkeeping expectations for your class, project, or lab.
A common mistake is focusing on the cover or dimensions while overlooking required page structure, numbering, or space for the kind of notes being collected. Check any instructor or organization rules first, then compare those requirements with the notebook’s described features. Consider whether the dimensions are comfortable to carry and whether the intended users have enough room for entries, diagrams, or tables. For a shared course, consistency can help users follow the same recordkeeping expectations. Choose a format that makes it easy to keep notes organized and accessible throughout the work.
What to look for:
- Page layout that meets class or lab requirements
- Space for the kinds of notes and diagrams needed
- Dimensions practical for carrying and use
- Product details that confirm the expected notebook format
- A consistent approach for group recordkeeping
Vela Sciences Advanced E7-C Expanded Hardcover Lab Notebook, 9.25 x 11.75 in, 14

This hardcover lab notebook features a durable sewn binding, heavyweight paper, and a lab-ready layout with pre-numbered pages, reference charts, and user information pages. Designed for scientific use, it is acid-free, archival quality, and environmentally sustainable, suitable for long-term research documentation.
Pros:
- Durable hardcover with sewn binding ensures longevity
- Heavyweight, high-quality paper minimizes ink bleedthrough
- Lab-ready layout with pre-numbered pages and reference charts
- Eco-friendly and recyclable materials
Cons:
- Heavyweight paper may be less suitable for quick note-taking
- Large size might be less portable for field use
Best for: learners whose recording needs suit the listed format and dimensions
Not ideal for: users whose lab requires a different page layout or notebook format
Bottom line: Check required recordkeeping rules and page layout before choosing this notebook.
Build the kit in a practical order: first confirm required protective gear and clothing, then match measurement tools and containers to the activities, and add slides and a notebook based on equipment and recordkeeping instructions. This puts requirements and fit ahead of convenience when deciding what belongs in the cart.
You do not need to solve every detail at once. Start with the procedures you expect to follow, check each item against them, and ask a teacher or lab supervisor when requirements are unclear. A checklist built around safe, compatible choices will be easier to use and maintain.
Fall Picks
fall essentials
As an affiliate, we earn on qualifying purchases.